Binance Classic EU Setup
Step-by-step guide for EU traders to connect Binance with Classic margin for BTC-ETH trading.
ETH/BTC Classic Futures Mode (EU)
Setup for Bitcoin/Ethereum-based trading infrastructure deployment within the European Union:
EU Classic Futures Mode
⚠️ Important Note: If you are planning on trading both ETH and BTC denominated portfolios, make sure that you create a separate sub account for each portfolio denomination. You should only have one type of collateral per sub account.
Profit Denomination (EU):New trading profits will be made in BNFCR (Binance's USD-margined futures collateral token). Binance Futures Credits are not stablecoins. It can not be transferred or withdrawn to your Spot wallet. To withdraw, you must first convert it into a non-stablecoin crypto asset such as BTC, ETH, BNB, or other available assets.
Auto-Exchange Protection:To ensure you don't pay a 2.5% conversion fee on BTC and ETH every time the Binance auto-exchange threshold is hit, we keep a larger buffer of BNFCR based on intra-day volatility. There is nothing you need to do here, it's just a note for you.
Step-by-Step Configuration
Navigate To Sub Accounts Management
Navigate to Subaccounts Management

Click Create Sub Account
Click Create Subaccount

Select Create with Email
This allows switching later for the same user interface experience as the main account.
⚠️ Important: You must use a real email address (the email+alias@provider.com trick does not work). If needed, set up an email alias with your provider to manage this.
Select "Create with Email" option
Enter the verification code sent to the email and confirm.

Enable Futures & Enable Switch
Enable Futures & Enable Switch

API Management
Click API Management or go directly here
Navigate to API Management

Create API
Click Create API

Configure API Keys
Select the correct subaccount and give the key a name (e.g., "ROBUXIO") – this is only for reference, any name works.
Configure your API key name

Copy API Credentials
⚠️ Critical: Copy your API Key and Secret Key immediately – they will only be shown once! Paste them into your Robuxio dashboard under "Settings" → "Profile" → "Add a new Profile"
Copy your API credentials immediately

Configure IP Restrictions
Press "Restrict Access To Trusted IPs Only" and input the 9 IP addresses below:
Configure IP restrictions with trusted addresses
52.194.221.7252.193.123.9454.64.179.21154.64.56.16252.198.114.1783.113.223.14418.181.70.12518.176.34.1813.230.199.38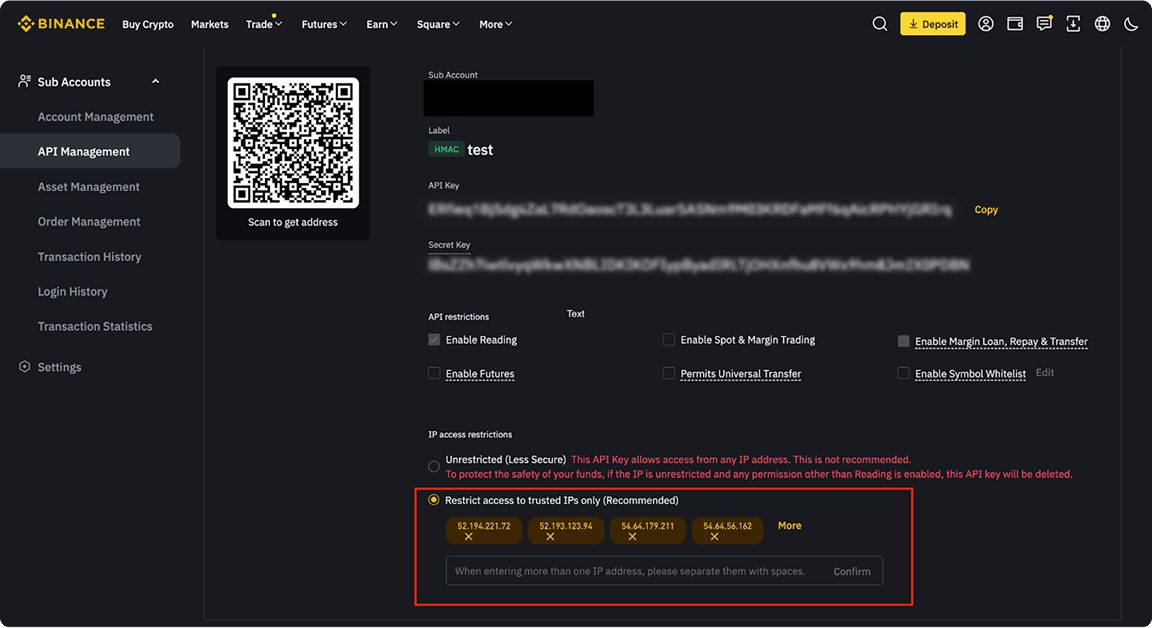
Enable Futures & Save
Enable "Futures" permission and save your API keys
Enable Futures and Save API keys

Transfer ETH/BTC Funds
Navigate to Subaccounts Management and press on the "…" and press "Transfer In"
Click "…" and select "Transfer In"
At the top, select your Main Account (where you deposited ETH/BTC). Transfer funds into the Spot account of your new USD-M Futures subaccount.
Transfer ETH/BTC from Main Account

Setup Complete!
Once the funds are in your sub account USD-M Futures account and you see them in your Robuxio dashboard you are all set!